Basecamp Card Tables: The Complete Guide
If your team works in Basecamp, you have probably seen the Card Table tool sitting in a project’s menu and wondered what it actually does. The Basecamp card table is Basecamp’s built-in kanban-style board: columns across the screen, cards you drag between them. It is not a to-do list, and it is not a replacement for one. It is a separate tool with its own rules, and once you understand those rules you can decide where it fits in how your team works.
This guide covers what a card table is, how columns and cards behave, how the built-in triage column works, and when a card table beats a plain to-do list. Then we cover what the card table does not give you natively, and how Assistant for Basecamp adds tags, statuses, and custom fields on top of your existing cards.
What is a Basecamp card table?
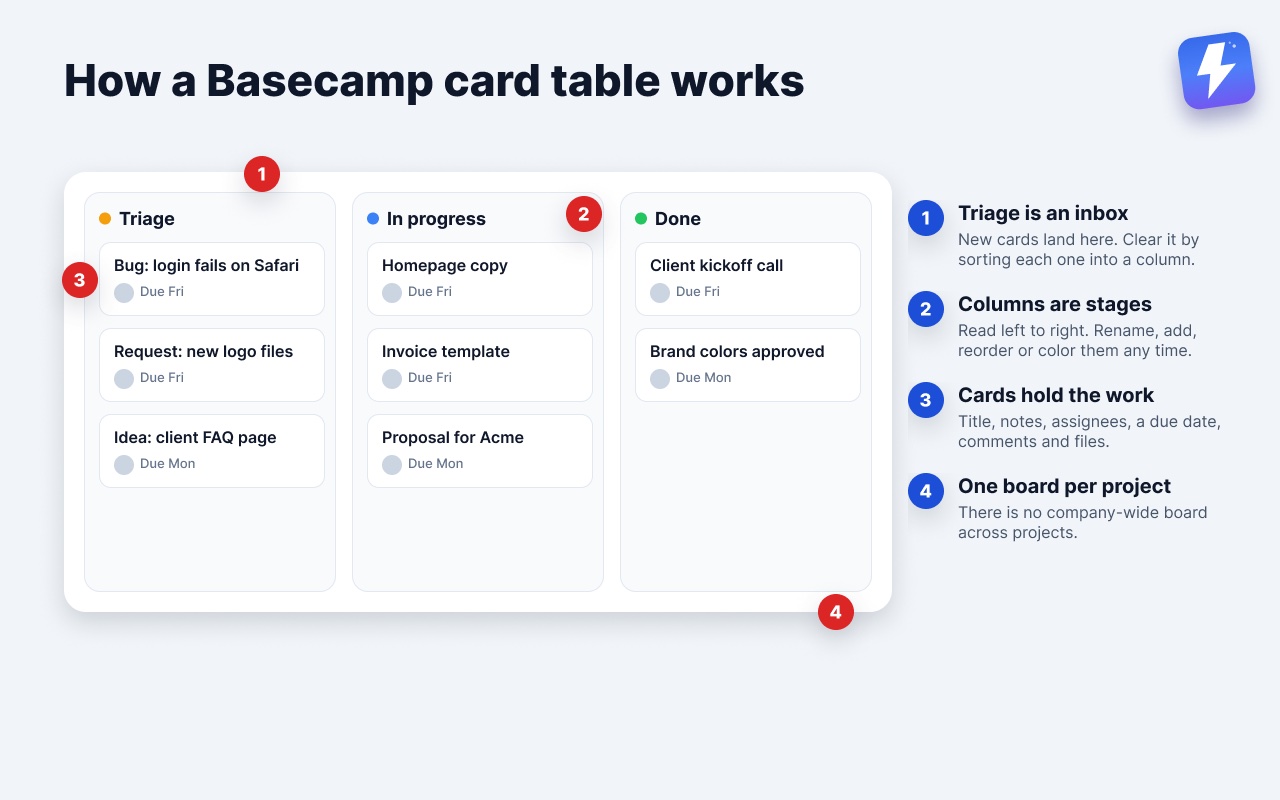
A card table is one of the tools Basecamp lets you turn on inside a project, alongside the message board, to-dos, docs and files, and the schedule. When you add it, you get a board with columns and cards. Cards are the work items. Columns are the stages those items move through.
The default board ships with a few columns already in place: a Triage column on the far left, a Not now column, and columns for in-progress and done work. You rename them, add more, or remove the ones you do not use. A card holds a title, a description, assignees, a due date, comments, and file attachments, which is roughly the same set of details a to-do holds. The difference is in how you see and move that work.
A card table is per-project. Each project that turns the tool on gets its own board. There is no single company-wide board in Basecamp that pulls cards from every project into one view.
How columns work
Columns are the stages of your workflow, read left to right. A simple board might be Triage → In progress → Done. A support board might be New → Investigating → Waiting on customer → Resolved. You decide the stages; Basecamp does not force a template on you.
A few things worth knowing about columns:
- You can add, rename, reorder, and remove columns at any time.
- You can set a color on a column so the board is easier to scan.
- Moving a card from one column to the next is a drag, and that move is the signal that work has progressed a stage. The board is a status report you never have to write.
The leftmost column, Triage, is special, which is the next thing to understand.
What is the Triage column for?
Triage is a holding area for cards that have not been sorted yet. When someone adds a card without picking a column, or when a card comes in that nobody has looked at, it lands in Triage. The idea is that Triage is a queue you clear: you read each new card, decide what it is, and move it into a real column (or delete it).
Cards in Triage are not assigned a real stage yet. Treat the column as an inbox. If cards pile up there, that is your signal that intake is outrunning sorting, which is useful information on its own. Some teams run a short daily pass over Triage so nothing sits unsorted for long.
How cards work
A card is a single piece of work. Click a card and a panel opens with everything attached to it: the description, who it is assigned to, the due date, a comment thread, and any files. You can:
- Assign one or more people to a card.
- Set a due date so it shows up in the project schedule.
- Comment back and forth, the same way you would on a to-do or message.
- Attach files directly to the card.
- Move it between columns by dragging, or from inside the card itself.
Cards behave a lot like to-dos in what they hold. The real distinction is the board view around them. To-dos live in lists you scroll; cards live in columns you scan side by side.
How to use a Basecamp card table for triage
Card tables are at their best for incoming, unpredictable work, where you do not know in advance how many items will arrive or what stage each one needs. A triage workflow looks like this:
- New work arrives as a card in the Triage column. This might be a bug report, a client request, a content idea, or an inbound lead.
- Someone reviews each card and decides: is this real, is it a duplicate, who owns it, how urgent is it.
- The card gets an owner, a due date if needed, and a drag into the right column.
- As work proceeds, whoever is on it drags the card forward through the columns.
- Finished cards land in a done column, where they stay as a record or get archived.
The whole point is that the board shows the shape of the queue at a glance. You can see twelve cards stacked in Investigating and know exactly where the bottleneck is, without anyone writing a status update.
When to use a card table vs a to-do list
This is the question most teams actually need answered, so here is the honest split.
Use a card table when:
- Work moves through clear stages and you want to see those stages side by side.
- Items arrive unpredictably and need sorting before they get worked on (support, bugs, inbound requests, editorial pipelines).
- You care more about where each item is in the flow than about a fixed checklist of everything that must get done.
Use a to-do list when:
- You have a known, finite set of tasks that all need to get done (a launch checklist, an onboarding sequence, a project plan).
- Order and grouping matter more than stage. To-do lists nest under headings and read top to bottom.
- You want the simplest possible thing. A to-do list has less overhead than a board, and most Basecamp work lives in to-dos for exactly that reason.
A lot of teams run both in the same project: to-dos for the planned, finite work, and a card table for the flowing, unpredictable work. We go deeper on this split in Basecamp Card Table vs To-Do List: When to Use Which.
Card tables vs to-do lists vs Kanban: clearing up the confusion
People often ask whether Basecamp “has Kanban.” The card table is Basecamp’s kanban-style tool, so the answer is yes, for cards. The catch is that it only works for cards. The work most teams keep in to-do lists has no board view at all. You cannot watch a to-do move across columns, because to-dos are not cards. We cover that distinction fully in Does Basecamp Have a Kanban View?.
So there are really two separate questions:
- Do you want a board for work that already lives in a card table? Use the native card table. It is built for that.
- Do you want a board for work that lives in your to-do lists? The card table will not do that, because it does not read your to-dos.
That second gap is where an add-on comes in.
What the card table does not give you
The native card table is solid for moving cards through stages. It is also deliberately simple, which means some things teams ask for are not there:
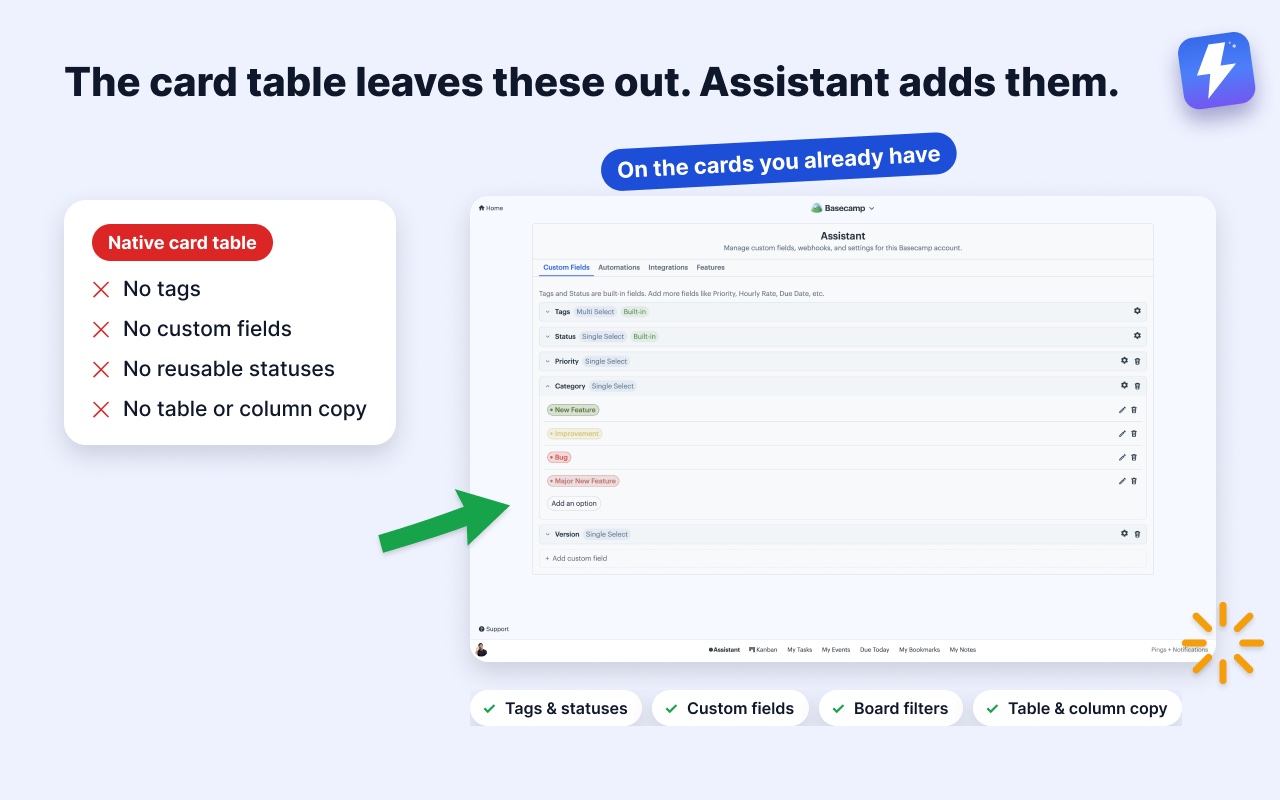
- No tags. You cannot tag a card “urgent” or “client-x” and filter by it.
- No custom fields. There is no way to add a priority field, a budget number, a stage dropdown, or any structured data beyond title, assignee, and due date.
- No saved statuses you can reuse. A column is a column; there is no separate status label you can apply across cards and filter on.
- No table or column duplication. A single card copies and moves natively, you can move a whole card table to another project, and Basecamp has Project Templates at the project level. What is missing is everything in between: you cannot duplicate a card table, and you cannot copy or move a single column into another table. (More on the workarounds in How to Use Basecamp Templates and Card Workarounds and How to Duplicate or Copy a Card in Basecamp.)
None of these are bugs. Basecamp keeps the card table minimal on purpose. But if you run a busy board, the lack of tags and fields starts to hurt, because you cannot slice the board by anything other than column.
How Assistant for Basecamp adds tags, statuses, and fields to cards
This is where we come in. Assistant for Basecamp is a browser extension that runs inside Basecamp itself. It does not move your projects anywhere; your cards and to-dos stay in Basecamp, read and written through Basecamp’s own API. What it adds is the structure the native card table leaves out.
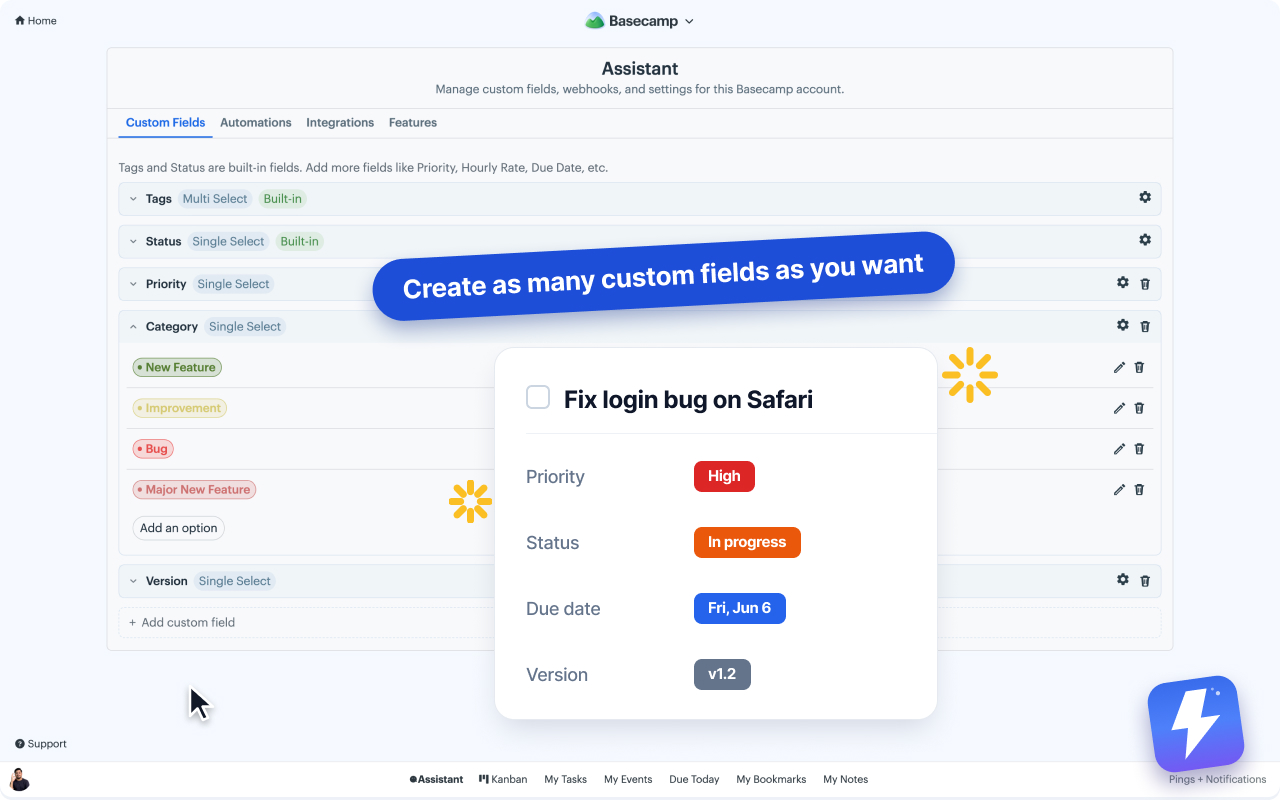
On your existing cards, you can add:
- Tags and statuses. Apply a colored tag like “urgent” or a status like “blocked” to any card, then filter the board down to just those. Statuses and tags also work on to-dos and messages, not only cards. See How to Add Tags to Basecamp To-dos and Cards and How to Add Custom Statuses to Basecamp Tasks.
- Custom fields. Add single-select, multi-select, text, number, or date fields to your cards, each shown as a colored badge. Priority, effort, client name, budget, target date, whatever your workflow needs. Full walkthrough in How to Add Custom Fields to Basecamp.
- Board filters. Filter the board by tag, status, or field value so you can answer “show me every high-priority card assigned to Sara” in two clicks.
- Table and column copy and move. Duplicate an entire card table in one click, or copy or move a whole column into another table, within the same project or across projects, with cards, comments, and attachments included. Each one runs as a job you can pause and resume. More in How to Duplicate or Copy a Card in Basecamp.
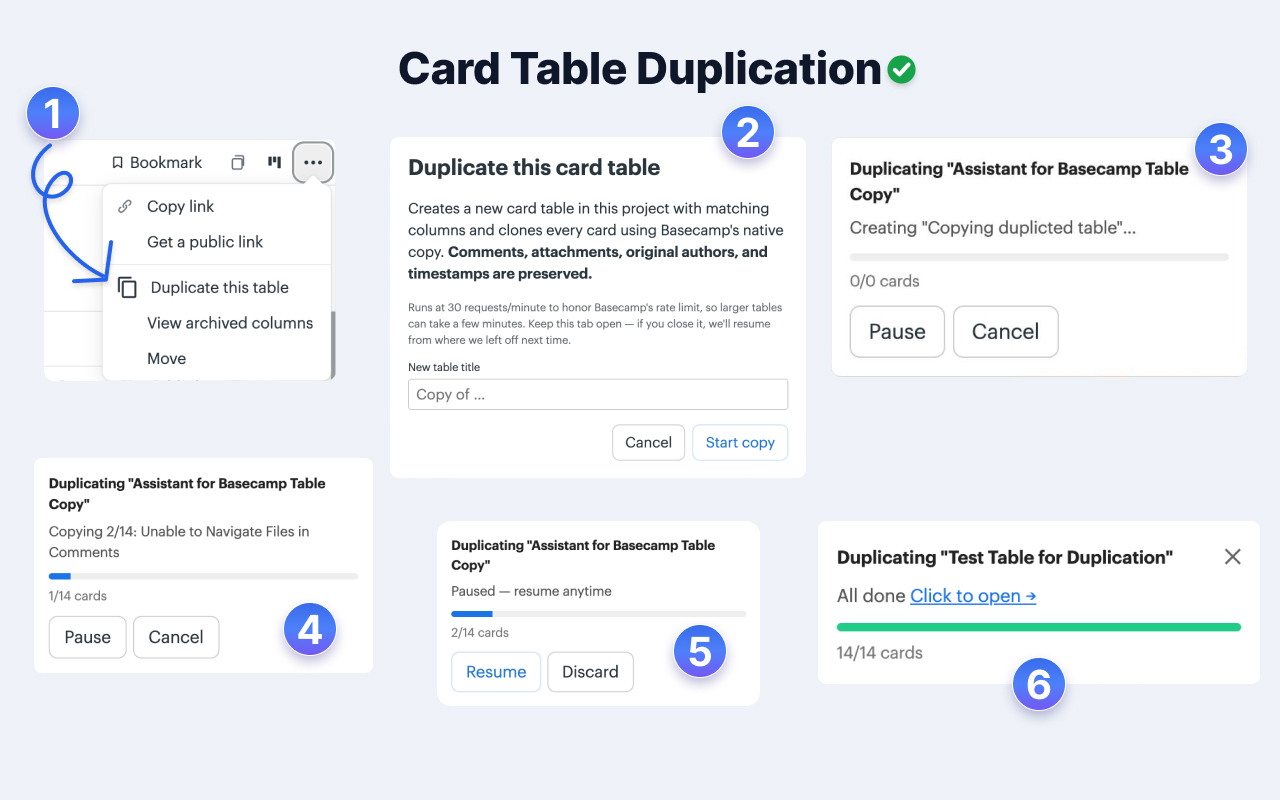
To be clear about the boundary: it does not add formal card-table templates, and it does not copy or move individual cards; the unit is always the table or the column. It enhances and reuses the cards you already have, with fields, tags, statuses, and filtering, and it builds on top of Basecamp’s native card table rather than replacing it.
There is one more thing worth saying plainly. Assistant for Basecamp also brings a kanban board to your to-do lists, where each to-do list becomes a column. That is the board the native card table cannot give you, because the card table only knows about cards. If your real work lives in to-do lists, that is the feature to look at: How to Add a Kanban Board to Basecamp, with the complete rundown on the Kanban board for Basecamp page.
Where the native card table still wins
If your work already lives in card tables and you only need columns, assignees, and due dates, the native tool is enough. You do not need an add-on to drag cards between columns; Basecamp does that out of the box, for free, and it does it well. The card table also handles Triage cleanly, and the per-project structure keeps each project’s board focused.
The case for adding tags and fields only kicks in when your board gets busy enough that “which column is it in” stops being enough to answer “what is the state of this work.” If you are not there yet, stay with the native card table.
Getting started
To turn on a card table, open a project, click the menu to add tools, and enable Card Table. Basecamp gives you a starter board with a Triage column; rename the columns to match your stages and start adding cards.
If you want tags, statuses, custom fields, and filtering on those cards, Assistant for Basecamp installs as a browser extension and adds them inside Basecamp. It is $29/month or $290/year for unlimited seats, where one admin pays and the whole team gets it, with a 7-day free trial and no card needed. The getting started guide walks through the first setup, and the custom fields docs cover adding fields to cards.
Start with the native card table. Add structure only when the board gets too busy to read at a glance.
Useful? Tell Google you want more of this.