MCP for Assistant
Your AI agent, working your Basecamp fields.
Claude, ChatGPT, Claude Code, Codex, or any MCP client can set statuses, tag work, save board views, and manage automation rules in Assistant. Sign in from the client, or use a token. Basecamp itself stays on Basecamp's own API, where your agent already talks to it.
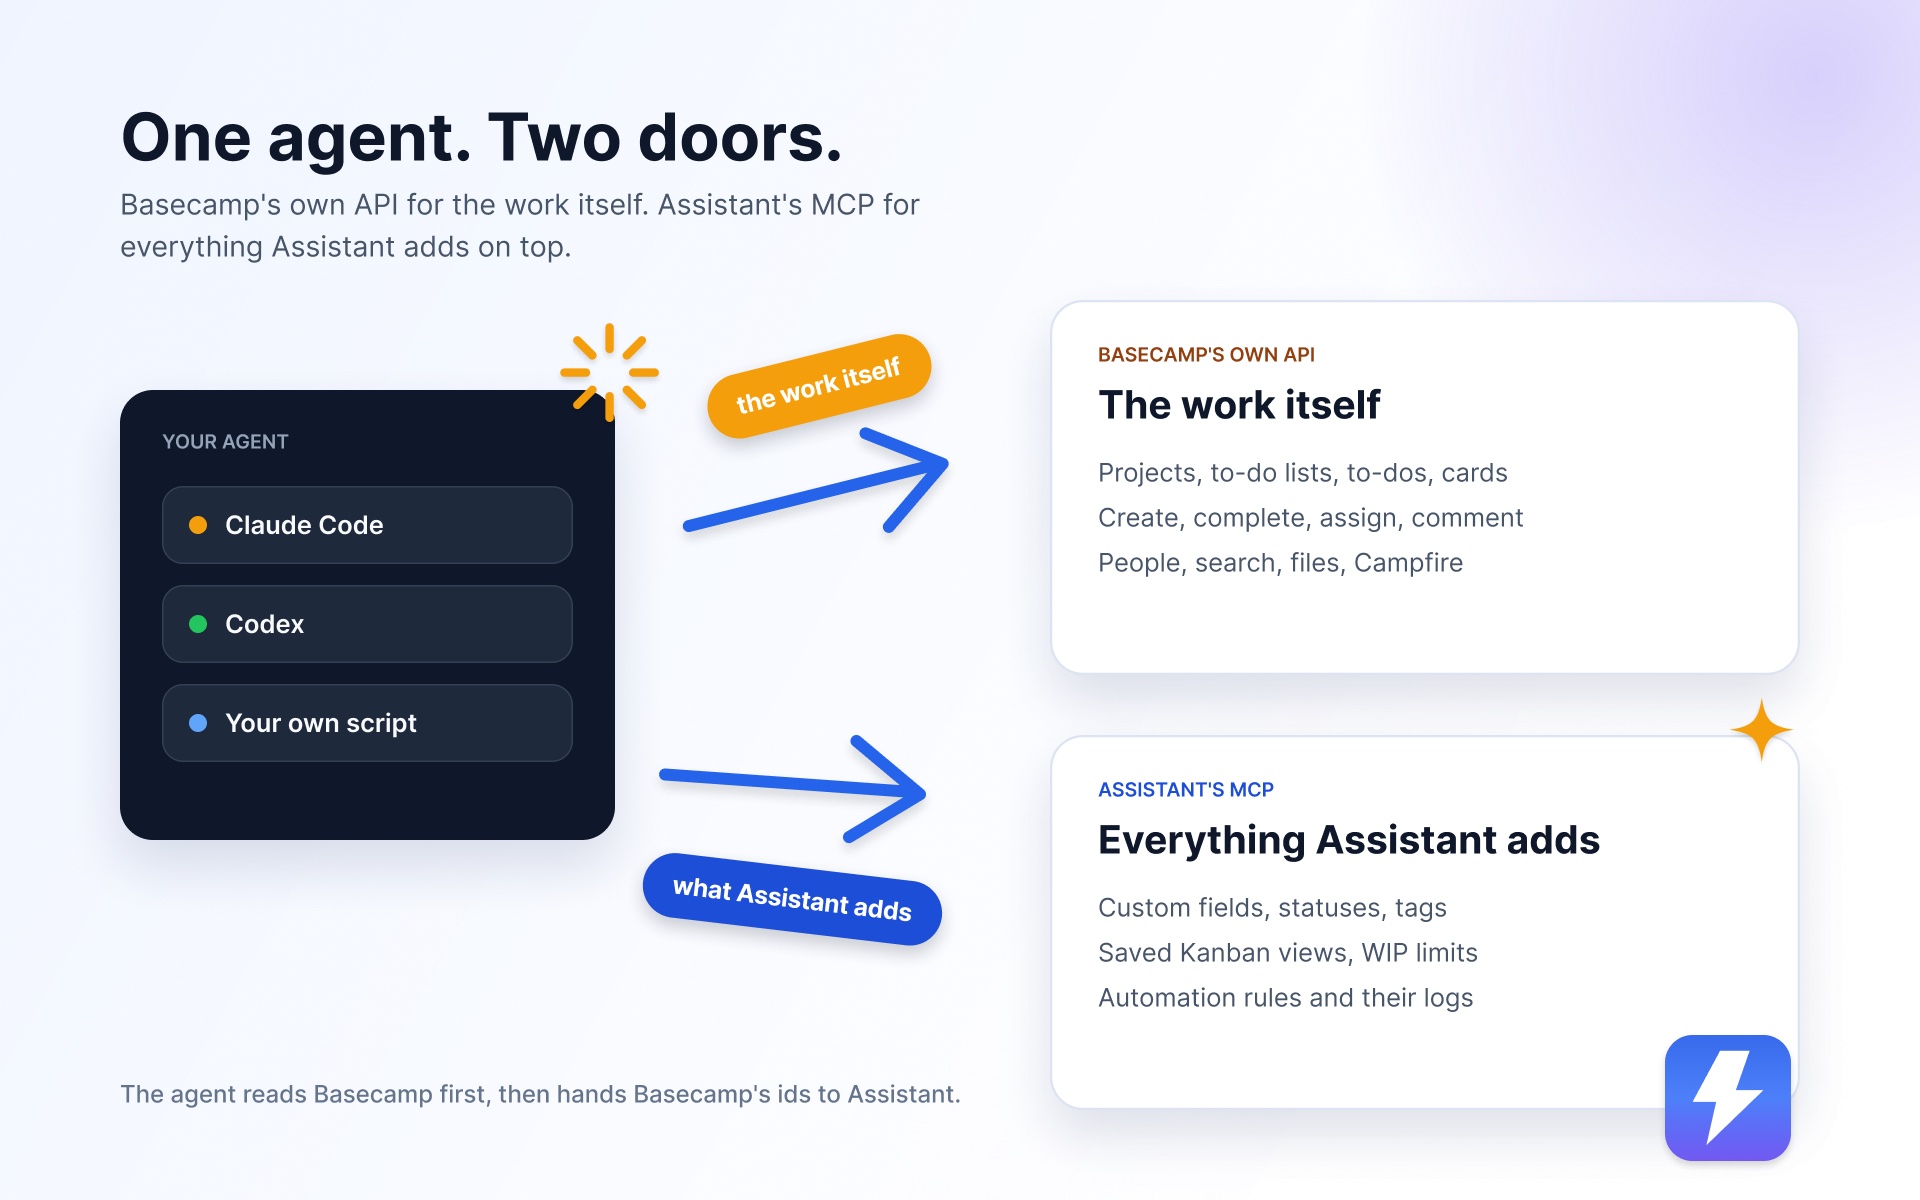
Two doors, one workspace.
Assistant keeps its records next to your Basecamp data, not inside it. So an agent uses Basecamp's API for the work itself and Assistant's MCP for everything Assistant adds on top.
Through Assistant's MCP
- Custom field values, including Status and Tags
- Field and option setup
- Which fields show in which project
- Saved Kanban views
- Automation rules and their logs
- WIP limits on board columns
Through Basecamp's own API or CLI
- Projects, to-do lists, to-dos, cards
- Creating, completing, assigning, commenting
- Moving cards between card-table columns
- People, search, files, Campfire
The agent reads Basecamp first, then hands Basecamp's ids to Assistant.
Setup
Three steps, nothing to copy.
- 1 Add the server to your client. claude.ai, Claude Desktop and ChatGPT take it as a custom connector; Claude Code takes one command; Codex takes the URL in its Plugins screen. The endpoint is
https://api.getassistant.io/mcp. - 2 Approve it. The client opens Assistant: sign in with Basecamp, pick the workspace and read-only or read and write, click Allow. A client without a sign-in takes a token from the dashboard instead.
- 3 Ask for something. "List the fields in this workspace", then "set Priority to High on to-do 123". The agent finds the ids; you use the names.
29 tools, each one an Assistant route.
Every tool maps to one route the extension already uses, so an agent can never do something the extension could not. Field and option parameters accept names, and an unknown name answers with the list of what exists.
Values on items
Read every value in a project in one call, set one value or a hundred, clear a value, attach or detach a tag. Names or ids, your choice.
See the tools →Fields and options
Create a field, rename it, add options to a status or a tag list, mark the option that means done. Workspace admins only, as in the extension.
See the tools →Per-project settings
Turn fields on or off for one project and choose which fields stay hidden there.
See the tools →Saved board views
Create, rename, and delete the Kanban views that belong to the token's user.
See the tools →Automation rules
List rules, write new ones from a trigger and actions, switch them on or off, and read the log of what fired. Admins only.
See the tools →WIP limits
Read and set the work-in-progress limit on any board column.
See the tools →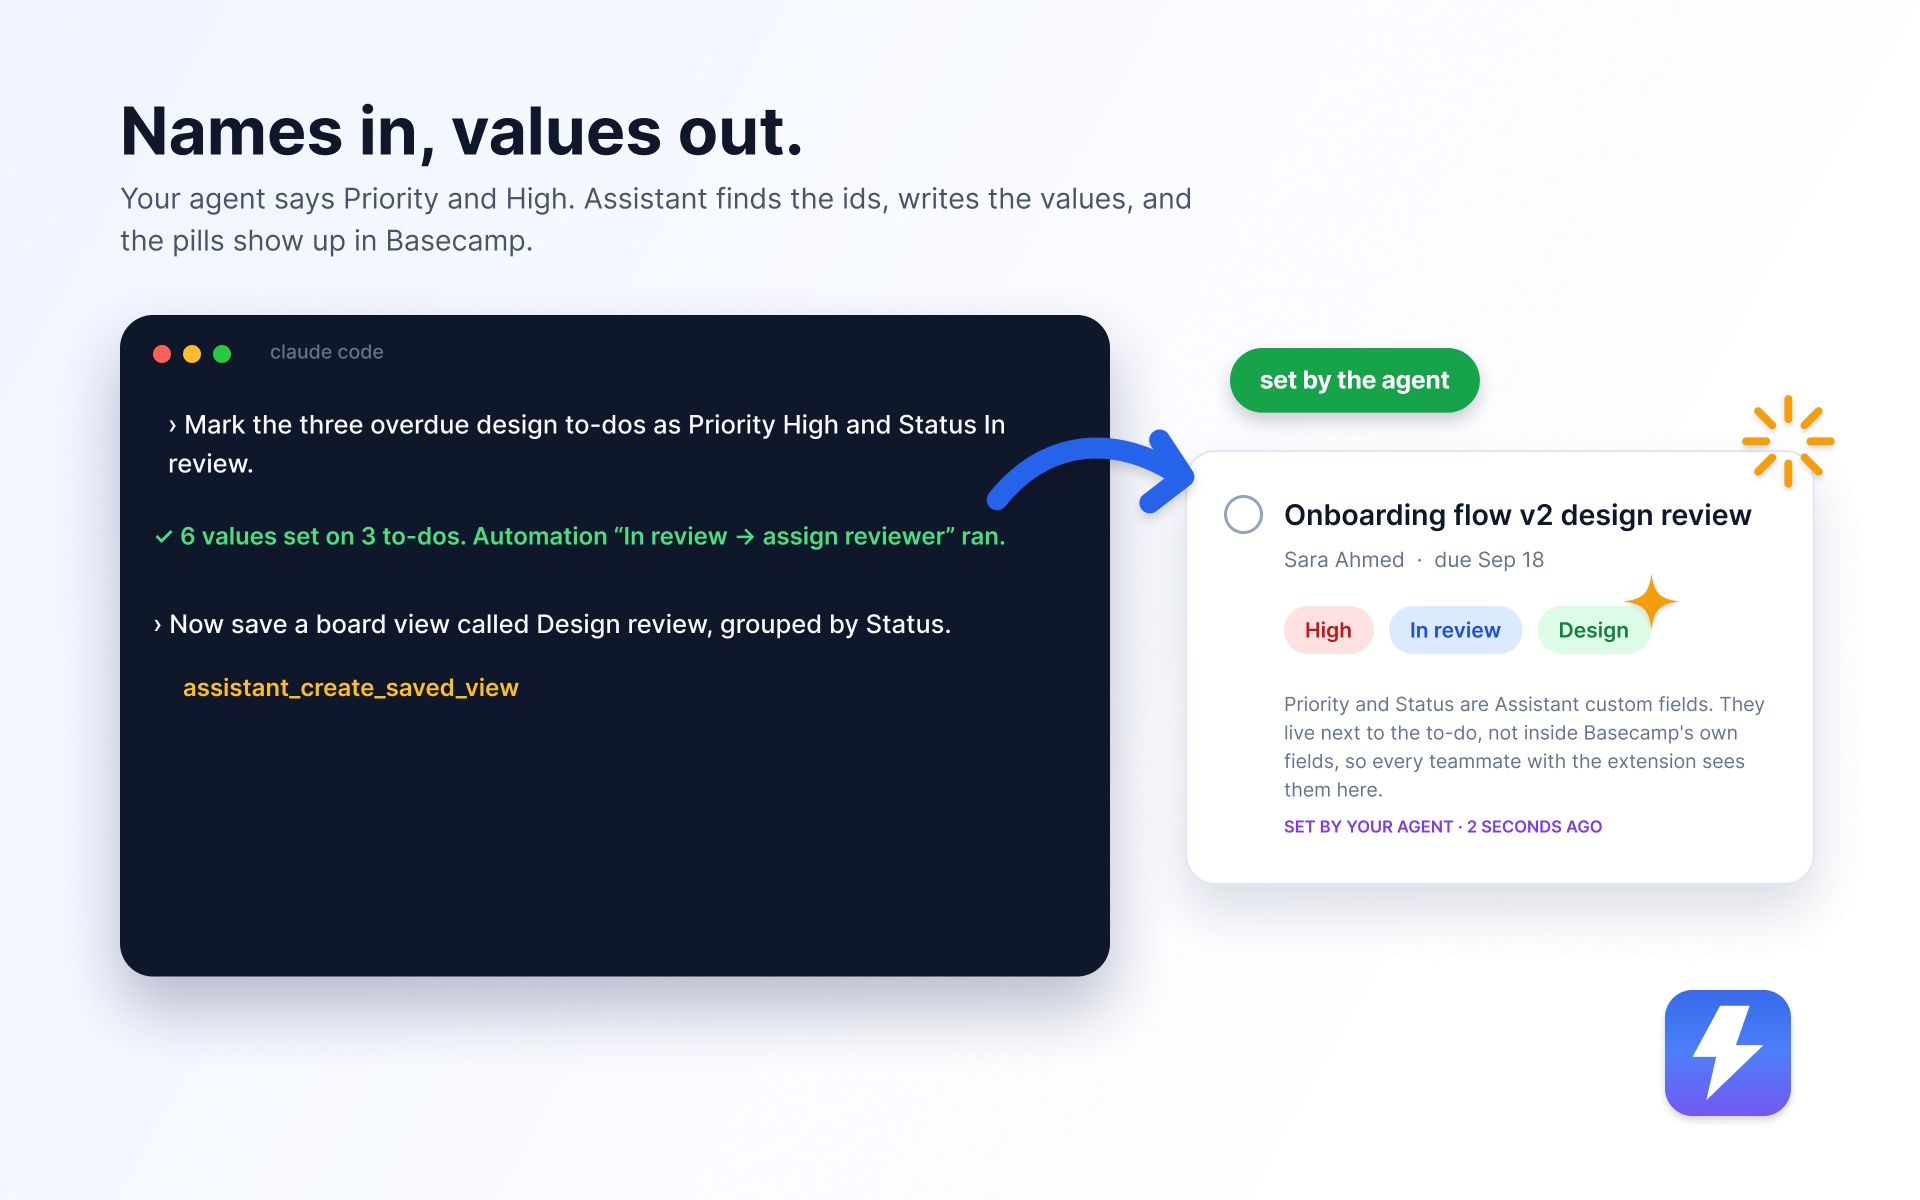
Setup guide
The exact commands.
1. Add the server to your client
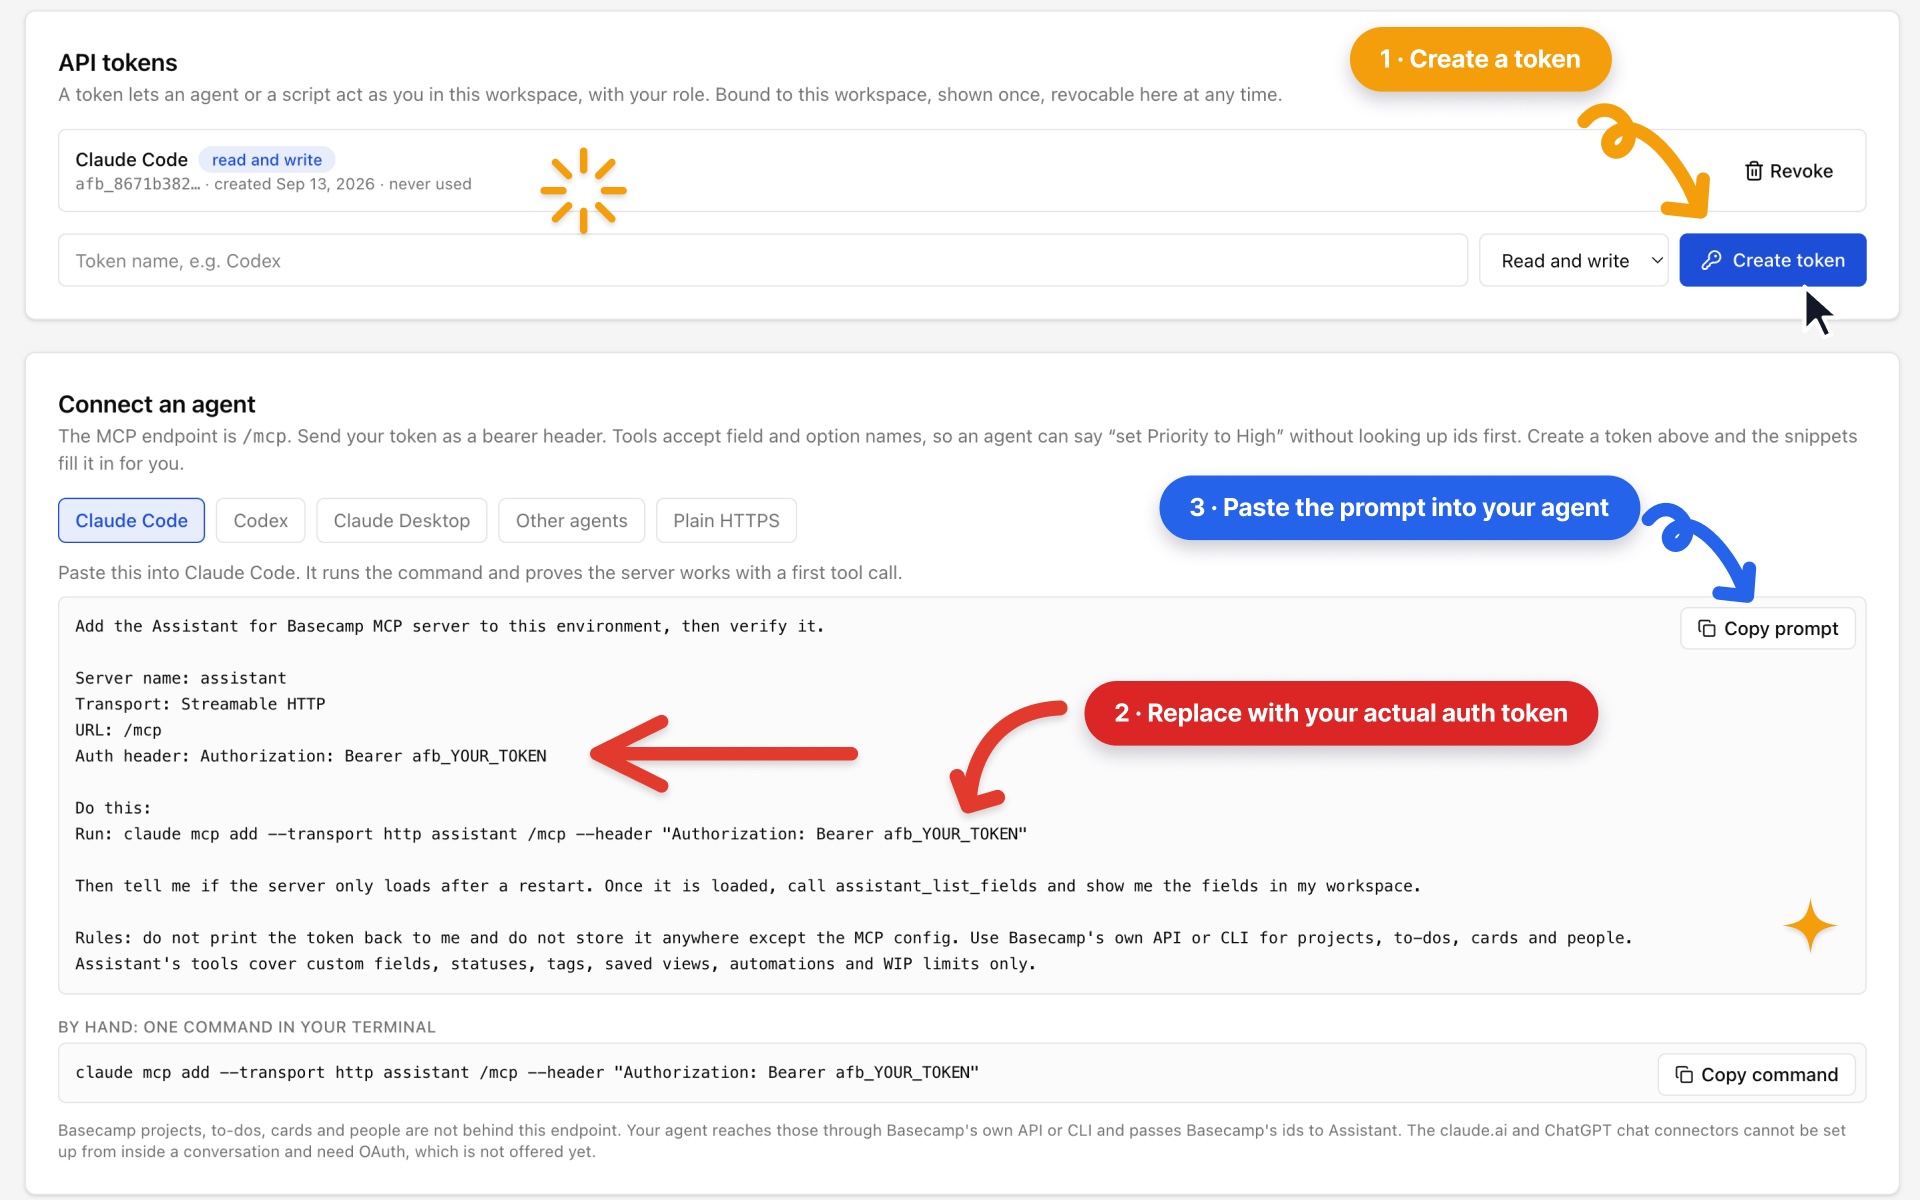
Pick your client. Each one starts with the sign-in route, where the client sends you to Assistant and you approve it there, nothing copied. Under it sits the token route for scripts and for clients that only send a header: replace afb_YOUR_TOKEN with a token from the dashboard, which fills it in for you.
Sign in. Add the server, then type /mcp inside Claude Code and choose Authenticate. A browser tab opens on Assistant: pick the workspace, click Allow, and you are connected.
claude mcp add --transport http assistant https://api.getassistant.io/mcpWith a token instead. Paste this into Claude Code. It runs the command and proves the server works with a first tool call.
Add the Assistant for Basecamp MCP server to this environment, then verify it.

Server name: assistant
Transport: Streamable HTTP
URL: https://api.getassistant.io/mcp
Auth header: Authorization: Bearer afb_YOUR_TOKEN

Do this:
Run: claude mcp add --transport http assistant https://api.getassistant.io/mcp --header "Authorization: Bearer afb_YOUR_TOKEN"
If my MCP config already lists other servers, add this one beside them and leave the rest untouched. If a server named "assistant" already exists, tell me before changing it.

Then tell me if the server only loads after a restart. Once it is loaded, call assistant_list_fields and show me the fields in my workspace.

Rules: do not print the token back to me and do not store it anywhere except the MCP config. Use Basecamp's own API or CLI for projects, to-dos, cards and people. Assistant's tools cover custom fields, statuses, tags, saved views, automations and WIP limits only.
By hand, one command in your terminal:
claude mcp add --transport http assistant https://api.getassistant.io/mcp --header "Authorization: Bearer afb_YOUR_TOKEN"The command adds one server next to any you already have. If a server named assistant already exists, give this one another name, for example assistant-basecamp.
claude.ai and Claude Desktop. Settings → Connectors → Add custom connector. Name it Assistant, paste the URL below, then Connect. Assistant opens: pick the workspace, click Allow. Every Claude surface that shares your account sees the connector.
https://api.getassistant.io/mcpChatGPT. Settings → Connectors → Create, with the same URL. Some plans keep custom connectors behind Developer mode under Advanced settings; turn it on first.
With a token instead, Claude Desktop only. Open claude_desktop_config.json (Settings → Developer → Edit Config), add the entry below inside the "mcpServers" object, save, and restart the app. It runs the mcp-remote bridge, which carries your token to the endpoint.
The file already lists servers? Paste this entry after the last one inside "mcpServers", with a comma between entries, and keep the rest of the file as it is.
"assistant": {
  "command": "npx",
  "args": [
    "-y",
    "mcp-remote",
    "https://api.getassistant.io/mcp",
    "--transport",
    "http-only",
    "--header",
    "Authorization:${AUTH_HEADER}"
  ],
  "env": {
    "AUTH_HEADER": "Bearer afb_YOUR_TOKEN"
  }
}
Starting from an empty file? Use the whole thing:
{
  "mcpServers": {
    "assistant": {
      "command": "npx",
      "args": [
        "-y",
        "mcp-remote",
        "https://api.getassistant.io/mcp",
        "--transport",
        "http-only",
        "--header",
        "Authorization:${AUTH_HEADER}"
      ],
      "env": {
        "AUTH_HEADER": "Bearer afb_YOUR_TOKEN"
      }
    }
  }
}
Watch it done first. The steps below, recorded in the Codex app.
Sign in from the Codex app.
- Open Settings and click Plugins in the sidebar.
- Click Add at the top right.
- Choose Add MCP server.
- Set Type to Streamable HTTP.
- Name:
Assistant. - URL:
https://api.getassistant.io/mcp. - Leave the bearer token and headers empty.
- Click Save.
- In the MCPs tab, search for
Assistant. - Click Authenticate next to it. Sign in with Basecamp, pick the workspace, click Allow.
Or from the terminal. The first command adds the server, the second opens the same sign-in:
codex mcp add assistant --url https://api.getassistant.io/mcp
codex mcp login assistant
The CLI, the desktop app, and the IDE extension share ~/.codex/config.toml, so either route covers all three.
With a token instead. Paste this into Codex.
Add the Assistant for Basecamp MCP server to this environment, then verify it.

Server name: assistant
Transport: Streamable HTTP
URL: https://api.getassistant.io/mcp
Auth header: Authorization: Bearer afb_YOUR_TOKEN

Do this:
1. Add this to ~/.codex/config.toml:
   [mcp_servers.assistant]
   url = "https://api.getassistant.io/mcp"
   bearer_token_env_var = "ASSISTANT_TOKEN"
2. Put the token in the ASSISTANT_TOKEN environment variable in my shell profile.
If my MCP config already lists other servers, add this one beside them and leave the rest untouched. If a server named "assistant" already exists, tell me before changing it.

Then tell me if the server only loads after a restart. Once it is loaded, call assistant_list_fields and show me the fields in my workspace.

Rules: do not print the token back to me and do not store it anywhere except the MCP config. Use Basecamp's own API or CLI for projects, to-dos, cards and people. Assistant's tools cover custom fields, statuses, tags, saved views, automations and WIP limits only.
By hand, add to ~/.codex/config.toml with the token in the ASSISTANT_TOKEN environment variable:
[mcp_servers.assistant]
url = "https://api.getassistant.io/mcp"
bearer_token_env_var = "ASSISTANT_TOKEN"
Each server is its own [mcp_servers.<name>] table, so paste this block below any servers already in the file. Nothing else in the file changes.
Codex cloud tasks do not read this file. From a cloud task, use the plain HTTPS routes.
Sign in. Cursor, Windsurf, and any client that supports OAuth for remote servers: add a Streamable HTTP server with the URL and no header. The sign-in opens the first time the client connects.
"assistant": {
  "type": "http",
  "url": "https://api.getassistant.io/mcp"
}
With a token instead. Cline, Gemini CLI, and any agent that can edit its own MCP config. Paste this into the chat:
Add the Assistant for Basecamp MCP server to this environment, then verify it.

Server name: assistant
Transport: Streamable HTTP
URL: https://api.getassistant.io/mcp
Auth header: Authorization: Bearer afb_YOUR_TOKEN

Do this:
Add a Streamable HTTP server named "assistant" with that URL and header to your own MCP configuration, in the format your config uses.
If my MCP config already lists other servers, add this one beside them and leave the rest untouched. If a server named "assistant" already exists, tell me before changing it.

Then tell me if the server only loads after a restart. Once it is loaded, call assistant_list_fields and show me the fields in my workspace.

Rules: do not print the token back to me and do not store it anywhere except the MCP config. Use Basecamp's own API or CLI for projects, to-dos, cards and people. Assistant's tools cover custom fields, statuses, tags, saved views, automations and WIP limits only.
By hand, the entry Cursor, Windsurf and Cline read. If the config already lists servers, paste it after the last one inside "mcpServers", with a comma between entries:
"assistant": {
  "type": "http",
  "url": "https://api.getassistant.io/mcp",
  "headers": {
    "Authorization": "Bearer afb_YOUR_TOKEN"
  }
}
Starting from an empty file? Use the whole thing:
{
  "mcpServers": {
    "assistant": {
      "type": "http",
      "url": "https://api.getassistant.io/mcp",
      "headers": {
        "Authorization": "Bearer afb_YOUR_TOKEN"
      }
    }
  }
}
Any script or automation tool, and Codex cloud tasks. Sign-in is for MCP clients; a script uses a token, which opens the same routes the extension uses. The workspace id is in the dashboard's URL.
curl -H "Authorization: Bearer afb_YOUR_TOKEN" https://api.getassistant.io/accounts/WORKSPACE_ID/custom-fieldsEvery route answers JSON. The Postman collection in the backend repo documents each one; the tool table below names the families.
2. Approve it on Assistant
The client opens app.getassistant.io. Sign in with Basecamp if you are not already, pick the workspace (an app is approved for one workspace, like a token), choose Read and write or Read only, and click Allow. The client finishes on its own. Access tokens last fifteen minutes and the client renews them in the background; approving the same app again replaces its earlier approval.
Tokens, for scripts and clients without a sign-in. Open app.getassistant.io/mcp, pick the workspace in the sidebar, and under API tokens name the token (the client it is for works well: "Cline", "nightly script"), choose the scope, and click Create token. Copy it: Assistant stores only a hash and cannot show it again. Any connected user can create up to ten per workspace. Tokens and approvals act with your role and work while the workspace is on its trial or subscribed.
3. Try it
- "List the custom fields in this workspace." (
assistant_list_fields) - "Show every field value in project 123." (
assistant_get_project_values) - "Set Priority to High on to-do 456 in project 123." (
assistant_set_field_value)
Field and option parameters take names or ids. "Priority" and "High" are enough; the agent never has to look up numbers. An unknown name answers with the list of fields and options that exist, so the agent can correct itself.
The tools
| Group | Tools |
|---|---|
| Values on items | list_fields, get_project_values, get_item_values, set_field_value, set_field_values (up to 100 at once), clear_field_value, attach_option, detach_option |
| Fields and options (admins) | create_field, update_field, delete_field, add_option, update_option, delete_option |
| Per-project settings (admins) | get_project_field_settings, set_project_field_settings |
| Saved board views (your own) | list_saved_views, create_saved_view, update_saved_view, delete_saved_view |
| Automations (admins) | list_automations, get_automation, create_automation, update_automation, toggle_automation, delete_automation, recent_automation_logs |
| WIP limits | get_wip_limits, set_wip_limit |
Every tool name carries the assistant_ prefix. Each maps to one Assistant route, so an agent can never do something the extension could not.
When something is refused
| Answer | Meaning |
|---|---|
401 API_TOKEN_INVALID | The token is wrong, expired, or revoked. |
403 API_TOKEN_ROUTE_FORBIDDEN | Tokens reach Assistant's records only. Billing, account settings, and Basecamp's own data are not behind them. |
403 API_TOKEN_WRONG_WORKSPACE | The token belongs to another workspace. |
403 API_TOKEN_READ_ONLY | A read-only token tried to change something. |
403 ACCOUNT_INACTIVE | The workspace's trial or subscription has ended. An admin can renew it from the billing page. |
429 RATE_LIMITED | Over the per-minute limit. Wait a minute. |
Disconnect an app or revoke a token
On the dashboard's MCP page, click Disconnect next to a connected app, or Revoke next to a token. A disconnected app is refused at once; a revoked token stops working within a minute. Approve or create a new one whenever you need it.
Safe to hand over
An app or a token is you, in one workspace, with your role.
Nothing an agent does through Assistant is invisible or unbounded. The approval or token carries your name into every value it sets, and you can pull it at any time.
- ✓Bound to one workspace. An approval or token given for one Basecamp account is refused on every other.
- ✓Your role, not more. Members cannot create fields or automation rules through a token either.
- ✓Your projects, not more. Assistant checks your Basecamp access to a project before it reads or writes anything about it.
- ✓Read-only when you want it. A read-only approval or token can list and read everything and change nothing.
- ✓Revoke in one click. A disconnected app is refused at once; a revoked token stops within a minute.
- ✓Rate limited. 60 requests a minute per app or token, 300 for the workspace, so a looping agent cannot flood your account.
- ✓No Basecamp proxy. Neither can read or write Basecamp itself through Assistant. That stays on Basecamp's API, under Basecamp's permissions.
Questions
Is this an MCP server for Basecamp itself? +
No. It covers the records Assistant adds to Basecamp: custom fields and their values, statuses, tags, saved board views, automation rules, and WIP limits. Projects, to-dos, cards, people, and comments live in Basecamp, and your agent reaches those through Basecamp's own API or command-line tool. Assistant's tools take Basecamp's ids, so the two work together in one session.
Which clients can connect? +
Any MCP client that speaks Streamable HTTP. Clients with a sign-in (the claude.ai and ChatGPT connectors, Claude Desktop, Claude Code, the Codex CLI, app, and IDE extension, Cursor, Windsurf) send you to Assistant to approve the app and pick the workspace. Clients that only send a bearer header, and Cline, use a token from the dashboard. Scripts and automation tools can skip MCP and call the same routes over plain HTTPS with a token.
Does it work from Codex in the cloud? +
Codex cloud tasks do not read your local MCP configuration, so use the plain HTTPS routes with your token from there. The Codex desktop app, CLI, and IDE extension connect to the MCP endpoint directly.
Can a token do more than the person who created it? +
No. A token or a signed-in app acts as you, in the one workspace you approved, with your role, on the projects Basecamp shows you. A member's token cannot create fields or automation rules, because a member cannot either, and nothing can read a project you are not on. A read-only token or grant cannot change anything.
Is there OAuth? +
Yes. The endpoint is an OAuth 2.1 resource server. A client that supports sign-in registers itself, sends you to Assistant, and you sign in with Basecamp, pick the workspace and read-only or read and write, and click Allow. Access tokens last fifteen minutes and the client renews them on its own. The app then appears under Connected apps on the dashboard's MCP page, where one click disconnects it. Tokens stay for scripts and for clients without a sign-in.
What are the limits? +
60 requests a minute per token or connected app and 300 a minute for the whole workspace. A batch call sets up to 100 field values at once. Past the limits, requests answer 429 and the client should wait a minute.
What does it cost? +
It is part of the one plan: $29 a month or $290 a year for your whole Basecamp account, unlimited users. Tokens work while the workspace is on its 7-day trial or subscribed.
Give your agent a hand in Basecamp.
Install the extension, create a token on the dashboard, connect your client. 7-day trial, no credit card.